Showing posts with label new features. Show all posts

Sunday, May 19, 2013

Read only Collections in .net framework 4.5

In this post we are going to discuss about some new interfaces implemented by ReadOnlyCollection<T> in .net framework 4.5. We are oing to discuss how they can help us. If you look at the definition of ReadOnlyCollection<T> in the framework, you would notice these additional interfaces being implemented. We discussed about ReadOnlyCollection<T> in our discussion about purely functional data structures. The updated definition of ReadOnlyCollection<T> in .net framework 4.5 is as follows:


You might have seen ReadOnlyCollection<T>(s) as the return type of methods. It is used to provide a readonly wrapper around an IList<T>. Although they are not thread safe if the underlying collection's elements count are being continously updated. They makes it impossible for the outside scope to temper the collection by introducing or removing elements as these operations cause exceptions thrown. You can also use AsReadOnly() provided by List<T> to have the same effect.

In order to return a read only view of the list, we need to create a new instance of ReadOnlyCollection<Studentgt;. This would make sure that any external update can be avoided on the collection. In order to do fulfill a similar requirement in .net framework 4.5, we just need to use IReadOnlyCollection based return type as the return type of the method. Although the user of this method can cast it to the generic List type and update the list, but the intent of the method is very clear that it is just returned for consumption. But there would be no exceptions for such operations.

Basically List<T> is provided with an updated definition in .net framework 4.5. It implements some additional interfaces. One of them is IReadOnlyCollection<T>. Is this semantically correct to implement such interfaces when the the type allows adding and removing items? Don't even worry about this is Implementation we are talking about, not inheritance. Implementing an interface just means the "Can Do" for a type. Let's not confuse the interface implementation with inheritance. List<T>; can be used in all places where a reference of interface type is used including method parameters and return type. Hence Liskov's Substitution Principle still holds true.


Here Student is a simple class with two properties StudentId and StudentName. The class exposes observational immutability. Here the definition of Student can be as follows:

Other Related Interfaces
In the above discussion, we can notice that List<T> also implements IReadOnlyList<T> . Basically .net framework 4.5 also includes some other interfaces including IReadOnlyList<T> and IReadOnlyDictionary<TKey, TValue>. Here the former provides an index support to IReadOnlyCollection<T> and latter can be used to provide a read only view of the dictionary.


You can verify that the definition of Dictionary<T> has also been updated to support IReadOnlyDictionary<TKey, TValue>.


Covariance & New Interface Types
IReadOnlyCollection and IReadOnlyList are covariant collections. As you might remember the feature of covariance and contravariance was introduced in .net framework 4.0. As we know that a type's instance can be assigned to the reference of its base type or interface type based on Polymorphism. Covariance allows a collection of child class to be assigned to a collection of base type. This is defined with out keyword with generic parameter.

In the above code, GetStudents() is supposed to return a collection of Student. But it returns one for GraduateStudent. Here GraduateStudent is a sub-type of Student. This is specially useful for API implementation where a sub-type needs to return the collection of child type of the type argument. This generally comes as a surprise while implementing child classes. The definition of GraduateStudent can be as follows:

Download Code

Saturday, April 13, 2013

Tips & Tricks: Visual Studio 2012 Code Flow Navigation - Without Code Map

In Debugger Canvas post, we discussed about a Visual Studio 2010 Devlab's extension developed with the collaboration between Microsoft Code Canvas team and Brown University. We discussed how easily we can navigate through the call stack using Debugger Canvas while focusing on the flow.

Visual Studio 2012 has a lot of very interesting feature. Code Map is one of them. This tool helps us in going through the call hierarchy analyzing the code base through caller / callee relationship. This also helps us going through the call stack in a graphical way. This is departure from the previous approach of Visual Studio which relied on providing a stack frames details in a list. While stepping in and out of the call stack in a complex code, it is very easy to lose track. In this post we are going to discuss how we can map the code flow using features available in Visual Studio 2012 excluding code map. In the next post, we are going to see how the same requirements are fulfilled by code map tool in Visual Studio. These are the tools which enables us to understand the code flow without actually running it.

Not The Code Map Extension
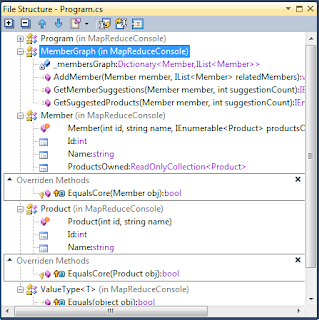
Please don't confuse this with another Visual Studio extension with the same name from AxTools. This extension allows us to view the way code is structured in a code file providing details about class members including methods, properties and events. The trial version of the extension is available in Visual Studio gallery. You can get it from Extensions and Updates option in Tools menu in Visual Studio.


Resharper also has similar feature called Resharper File Structure. Hit Ctrl + F11 with Resharper keyboard scheme and you should see a similar tool window. You can dock it within Visual Studio real estate to the side or move it to another monitor.


View Call Hierarchy
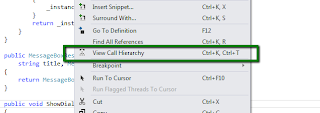
The best option available has been View Call Hierarchy. You can also find it in Visual Studio 2010. It lets you select a method and shows the calls In and Out of it. If this is a method, it also shows some details about how it is implemented by the implementing classes and the related code flows.


There are mainly two options available for this including Calls To and Calls From. You can follow the possible call hierarchy by just expanding the tree nodes. There are other options available based on the context of the method. Like for an interface methods, there wouldn't be any code called from the interface members but other code might abstract the calls using this interface member which can be shown in Calls To section. It should also show the types implementing the interface and how the selected member is implemented by the concrete implementations.


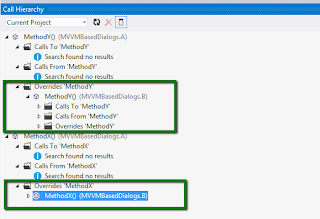
For the virutal and abstract members, it can show the types overriding the member. Here we have introduced two classes A and B. A is an abstract class with MethodX as an abstract member. It also has a virtual member with some default implementation. B is inheriting A overriding both these methods.

We can view the call hierarchy starting from A. As we select to view the call hierarchy for MethodX and MethodY, we individually select them from the code editor. Visual Studio IDE adds them to the same Call Hierarchy window.


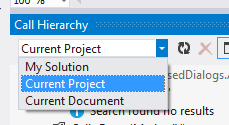
We can certainly scope the hierarchy navigation to the opened documents. The other option is to limit it to the project or even to widen the scope to the whole solution. Just look at the following drop down in the call hierarchy.


We can even see the call site where the member is actually referenced. This includes file name and line number of the code usage. Double clicking the call site should open and navigate to the specified code location.


VS2010 has the same feature but with more classical theme. Here I have added the call hierarchy for one of my test project.


Find All References
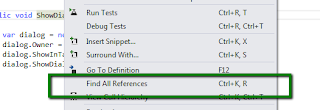
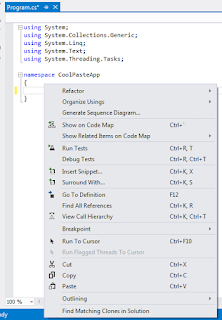
The other option is to select Find All References [Ctrl + R + T]. Just right click the member in the editor and select the following option:


The list of references are shown in a tool window. It supports code navigation i.e. when we double click the individual item, the referenced code is opened in an editor in Visual Studio IDE.


Global Search
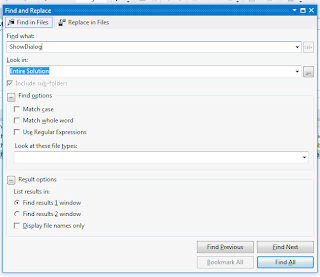
One option which always work for understanding the code flow is Global Search [Ctrl + Shift + F]. Identify the individual members in the code and try to see how and where they are referenced. There are references which are not possible to navigate at design time, they are only resolved at the time when the code is actually running. This is specially useful for such scenarios. But this gives so many entries that it is sometimes very difficult to navigate through the list.


Navigate To
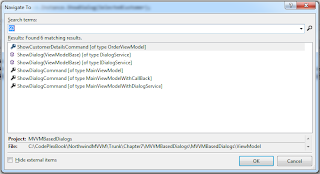
Visual Studio 2010 introduced Navigate To feature. This allowed to search the symbols throughout the code. The symbol can be type name itself including interface and concrete types. They can also be members of these types including methods, properties and events as well. This provides the ability of incremental search. The view keeps updating as we type the search pattern. This also includes fuzzy search capabilities searching on more than one words at the same time. Hitting Ctrl + , should open the following dialog in Visual Studio. This feature is also available in Visual Studio 2012.


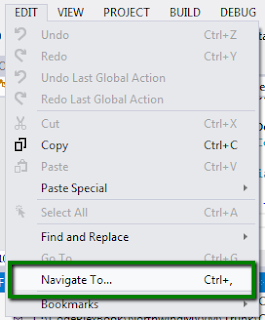
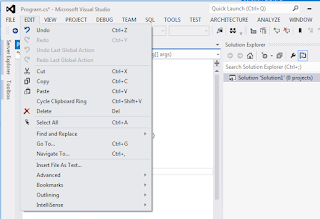
You can also open the dialog from the following menu:


Enhanced Solution Explorer
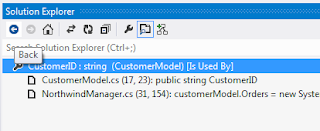
If you have tried Productivity Power tools for Visual Studio 2010 then you might remember an enhanced solution navigation tool window, called Solution Navigator. It combined some of the features of Class View, Navigate To, View Call Hierarchy, all merged into Solution Explorer. It has been a break through code navigation tool from Visual Studio Platform team in Microsoft. Since the natural trend is to incorporate successful tools from Power tools to Visual Studio RTM, many of the features of Solution Navigator have become part of Solution Explorer in Visual Studio 2012. Additionally, Solution Navigator has been removed from Productivity Power tools for Visual Studio 2012. You can download the Productivity Power tools for Visual Studio 2012 [http://visualstudiogallery.msdn.microsoft.com/3a96a4dc-ba9c-4589-92c5-640e07332afd]. The latest update is released on 4th Apr, 2013.


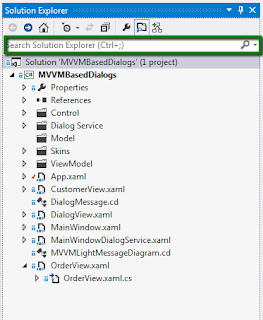
Please notice the solution explorer enhanced view in Visual Studio 2012.


It supports the same fuzzy, incremental searching and search based on pascal casing as in Navigate To tools. Like Navigate To tool, the search includes all the symbols including file names. Please remember that this is not a text search in the documents in the solution.


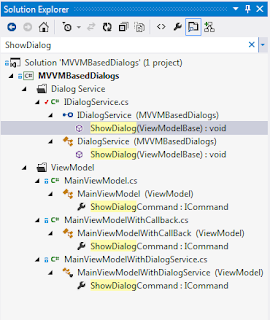
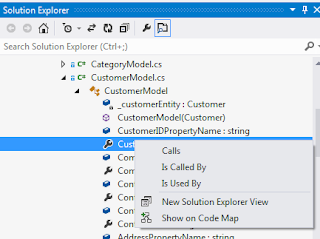
Like View Call Hierarchy window, it also supports seeing the possible call hierarchy and usage of a particular symbol. Here we have selected a property, the context menu of the property is displayed as follows:


Selecting any of these options would navigate to a new solution explorer view displaying only the specified request regarding calls or usage of the symbol. We can always navigate back to a previous view.


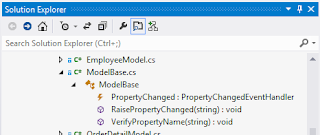
Borrowing the feature from class view, it shows the details of a class. It shows all the classes in a particular file which can be extended to see its members. But It doesn't show the inheritance details of a class unlike a class view.


Friday, March 15, 2013

Tips & Tricks - Pasting XML as Classes

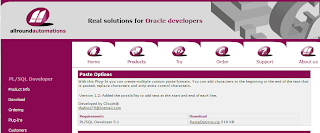
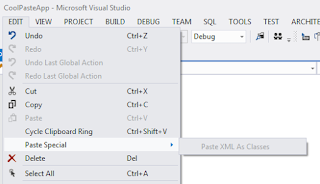
In this post we are going to discuss a simple yet very useful feature of Visual Studio 2012. If you have been working with XML then you might have felt the need to create concrete class types to hold the data from XML. Visual Studio 2012 comes with a feature which makes this work easier. We can easily create concrete class types from the XML data in the clipboard. It is one of the feature we can select to paste. I have used the customized paste with some other development tools including PL/SQL developer from AllroundAutomations which even allows users to create their own paste formats.


As discussed the feature allows to create classes from XML data in the clipboard. If the XML data is nested it would be creating separate classes to hold the nested data. There are conventions it follows for naming the class members based on the XML element's name.


Now copy some XML data. For our example we can use the following:

This xml has a Document Node, Student. It has two leaf level nodes including Id and Gender. It has a child node Name which has two further child elements including FirstName and LastName. Based on the convention, it creates leaf nodes as separate properties in the class for the nodes. For non-leaf nodes, it creates separate class types. Now copy the xml. So now we have this in the clipboard. Go to Visual Studio 2012 when a class file is already opened and select Edit -> Paste Special -> Paste XML as Classes. This would create the following classes.

As you have seen it has create separate properties for Id and Gender elements. It creates a separate class for StudentName corresponding to the Name element in the xml. The name of this extra types is based on the convention including the all parents and child elements in the nested hierarchy. The StudentName has further two properties FirstName and LastName corresponding to the child elements in the source XML. It has been used for a property in Student type. The data type for these elements are inferred so you can see Id has been created as a byte type. You can change it if you want.

The types wouldn't be created in a namespace so you might want to paste them directly or move them to your namespace section. If there is no XML in the clipboard then the menu item is just greyed out.


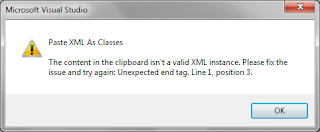
If the data in the clipboard is not in the xml format then the behavior doesn't seem to be very consistent. It is intially available if you have just copied some data, e.g. an image, it shows an error message when you select it. This could definitely improve.


Then it is greyed out eventually as I would generally expect. But I was able to reproduce this only a few times. This is not tied to the Cycle Clipboard Ring. We can use Clipboard ring to get to the items in the clipboard by cycling through these items using CTRL + SHIFT + V. But that would be a regular paste.

Feature Restrictions:
The feature is only available for class files added in a project opened in Visual Studio 2012. If you open a file separately in Visual Studio, the feature is is not available.


It would have been cooler if the option was available for the context menu as well. There is no support in the current version.


Other developers have noticed this feature is not available for WP7 projects. You can find a related discussion here:

http://social.msdn.microsoft.com/Forums/en-US/visualstudiogeneral/thread/b426d123-5100-4999-9cb0-094dbed87c60

Monday, August 8, 2011

Implicit DataTempates in Silverlight 5 Beta

In this post we are going to discuss a new feature expected to be released in Silverlight 5. This feature is implicit DataTemplates. Those who come from WPF background to Silverlight often find it difficult to design without implicit DataTemplates. Well, this limitation has been worked in Silverlight 5 and it is available in the beta release. Silverlight 5 beta tools can be downloaded from here:

http://www.microsoft.com/download/en/details.aspx?id=23887

Let's create a sample Silverlight application and name it AppSilverlightImplicitDataTemplates.


Make sure that you have Silverlight 5 option selected in the following screen displayed right after the previous one.


You would need a reference of System.Windows.Controls.Data.Input assembly for Labels. If you directly drag and drop the Label Control from Toolbox on the designer surface, the assembly is automatically referenced.


Let's suppose we have the following view model. It has a collection of students. We want the user to select a particular student and allow that to be edited.
namespace AppSilverlightImplicitDataTemplates
{
    using System.Collections.ObjectModel;
    using System.Collections.Generic;

    public class MainViewModel : ViewModelBase
    {
        ObservableCollection<StudentViewModel> _students;
        public  ObservableCollection<StudentViewModel> Students
        {
            get
            {
                if (_students == null)
                {
                    _students = new ObservableCollection<StudentViewModel>();
                    _students.Add(new StudentViewModel() { StudentFirstName = "Muhammad", StudentLastName = "Siddiqi" });
                    _students.Add(new StudentViewModel() { StudentFirstName = "Jayson", StudentLastName = "Abante" });
                    _students.Add(new StudentViewModel() { StudentFirstName = "Meena", StudentLastName = "Gulla" });                                        
                }
                return _students;
            }
        }
    }
}
The view model is inheriting from ViewModelBase class. It is basically for providing general functionality to all view models specially implementation of INotifyPropertyChanged interface. As you might have guessed, like this view model, all others view models in the application would also be inheriting from this.
namespace AppSilverlightImplicitDataTemplates
{
    using System.ComponentModel;

    public class ViewModelBase : INotifyPropertyChanged
    {
        #region INotifyPropertyChanged Implementation

        public event PropertyChangedEventHandler PropertyChanged = delegate { };
        protected void OnPropertyChanged(string propertyName)
        {
            PropertyChanged(this, new PropertyChangedEventArgs(propertyName));
        }

        #endregion

    }
}
In MainViewModel we have used StudentViewModel collection. It basically has two properties StudentFirstName and StudentLastName. Its definition can be as follows:
namespace AppSilverlightImplicitDataTemplates
{
    using System.ComponentModel;

    public class StudentViewModel : ViewModelBase
    {
        #region Notifiable Properties

        string _studentLastName;
        public string StudentLastName
        {
            get { return _studentLastName; }
            set
            {
                _studentLastName = value;
                OnPropertyChanged("StudentLastName");
            }
        }

        string _studentFirstName;
        public string StudentFirstName
        {
            get { return _studentFirstName; }
            set
            {
                _studentFirstName = value;
                OnPropertyChanged("StudentFirstName");
            }
        }

        #endregion

    }
}
As you can see above, it also inherits from ViewModelBase. The two properties support change notification by calling OnPropertyChanged method. In turn this would raise PropertyChanged event. As we have discussed already that we would be needing to use this view model in two different types of views. One is just for display for selection based control used to display the collection of students. We also need a different view to allow a student to be edited.

For displaying in collection based control:
<UserControl x:Class="AppSilverlightImplicitDataTemplates.StudentDisplayView"
        xmlns="http://schemas.microsoft.com/winfx/2006/xaml/presentation"
        xmlns:x="http://schemas.microsoft.com/winfx/2006/xaml"
        xmlns:d="http://schemas.microsoft.com/expression/blend/2008"
        xmlns:mc="http://schemas.openxmlformats.org/markup-compatibility/2006"
        mc:Ignorable="d" >    
    <TextBlock>
        <Run Text="{Binding StudentLastName}" FontWeight="Bold" />
        <Run Text="," />
        <Run Text="{Binding StudentFirstName}" />
    </TextBlock>
</UserControl>

For editing StudentViewModel:
<UserControl x:Class="AppSilverlightImplicitDataTemplates.StudentEditView"
        xmlns="http://schemas.microsoft.com/winfx/2006/xaml/presentation"
        xmlns:x="http://schemas.microsoft.com/winfx/2006/xaml"
        xmlns:d="http://schemas.microsoft.com/expression/blend/2008"
        xmlns:mc="http://schemas.openxmlformats.org/markup-compatibility/2006"    
        mc:Ignorable="d"
        xmlns:sdk="http://schemas.microsoft.com/winfx/2006/xaml/presentation/sdk" >
    <Grid x:Name="LayoutRoot" Background="White">
        <Grid.ColumnDefinitions>
            <ColumnDefinition Width="93" />
            <ColumnDefinition Width="307" />
        </Grid.ColumnDefinitions>
        <Grid.RowDefinitions>           
            <RowDefinition Height="35" />
            <RowDefinition Height="*" />            
        </Grid.RowDefinitions>     
        <sdk:Label Height="23" HorizontalAlignment="Left"
                   Margin="12,12,0,0"  VerticalAlignment="Top"                    
                   Content="First Name" Width="83" Grid.ColumnSpan="2" />
        <TextBox Height="23" HorizontalAlignment="Left" Margin="8,8,0,0" 
                 VerticalAlignment="Top" Width="287" Text="{Binding StudentFirstName}" Grid.Column="1" />
        <sdk:Label Content="Last Name" Height="23" HorizontalAlignment="Left" 
                   Margin="12,7,0,0" VerticalAlignment="Top" Width="83" Grid.Row="1" Grid.ColumnSpan="2" />
        <TextBox Height="23" HorizontalAlignment="Left" Margin="8,3,0,0" 
                 VerticalAlignment="Top" Width="287" Grid.Row="1" 
                 Text="{Binding StudentLastName}" Grid.Column="1" />
    </Grid>
</UserControl>

Using UserControls in DataTemplate
By default we need the StudentViewModel type of objects to be using the display one. So we can define it as application resource. Just updated App.xaml as follows:
<Application xmlns="http://schemas.microsoft.com/winfx/2006/xaml/presentation"
             xmlns:x="http://schemas.microsoft.com/winfx/2006/xaml" 
             x:Class="AppSilverlightImplicitDataTemplates.App"
             xmlns:local="clr-namespace:AppSilverlightImplicitDataTemplates"
             >
    <Application.Resources>
        <DataTemplate DataType="local:StudentViewModel">
            <local:StudentDisplayView />
        </DataTemplate>
    </Application.Resources>
</Application>
Now we define the Main application view. As we have discussed, we need to provide a collection of Students and allow the user to select any one of them and edit that.
<UserControl x:Class="AppSilverlightImplicitDataTemplates.MainPage"
        xmlns="http://schemas.microsoft.com/winfx/2006/xaml/presentation"
        xmlns:x="http://schemas.microsoft.com/winfx/2006/xaml"
        xmlns:d="http://schemas.microsoft.com/expression/blend/2008"
        xmlns:mc="http://schemas.openxmlformats.org/markup-compatibility/2006"
        xmlns:local="clr-namespace:AppSilverlightImplicitDataTemplates"
        mc:Ignorable="d"
        d:DesignHeight="300" d:DesignWidth="400"
        xmlns:sdk="http://schemas.microsoft.com/winfx/2006/xaml/presentation/sdk">
    <UserControl.DataContext>
        <local:MainViewModel />
    </UserControl.DataContext>    
    <Grid x:Name="LayoutRoot" Background="White">
        <Grid.ColumnDefinitions>
            <ColumnDefinition Width="97*" />
            <ColumnDefinition Width="303*" />
        </Grid.ColumnDefinitions>
        <Grid.RowDefinitions>
            <RowDefinition Height="43*" />
            <RowDefinition Height="257*" />
        </Grid.RowDefinitions>
        <sdk:Label Height="22" HorizontalAlignment="Left" Margin="11,18,0,0"
                   Name="label1" VerticalAlignment="Top" Width="86"
                   Content="Select Student" DataContext="{Binding Path=Students}" />
        <ComboBox Height="24" HorizontalAlignment="Left" Margin="6,14,0,0"
                  Name="cmbStudents" VerticalAlignment="Top" Width="285"
                  ItemsSource="{Binding Students}" Grid.Column="1" />
        <ContentControl 
            DataContext="{Binding ElementName=cmbStudents, Path=SelectedItem}" 
            Content="{Binding}" Grid.Row="1" Grid.Column="0" Grid.ColumnSpan="2" 
            Margin="11,18,0,0"/>
    </Grid>
</UserControl>
Now lets run the application. It appears as follows:


Now select a student from the combo box. The same student is loaded in the ContentControl as follows:


Now we need the ContentControl to be using the editing type of UserControl for StudentViewModel so that it could be edited. Let's override it as follows in the main view:
<UserControl x:Class="AppSilverlightImplicitDataTemplates.MainPage"
        xmlns="http://schemas.microsoft.com/winfx/2006/xaml/presentation"
        xmlns:x="http://schemas.microsoft.com/winfx/2006/xaml"
        xmlns:d="http://schemas.microsoft.com/expression/blend/2008"
        xmlns:mc="http://schemas.openxmlformats.org/markup-compatibility/2006"
        xmlns:local="clr-namespace:AppSilverlightImplicitDataTemplates"
        mc:Ignorable="d"
        d:DesignHeight="300" d:DesignWidth="400"
        xmlns:sdk="http://schemas.microsoft.com/winfx/2006/xaml/presentation/sdk">
    <UserControl.DataContext>
        <local:MainViewModel />
    </UserControl.DataContext>    
    <Grid x:Name="LayoutRoot" Background="White">
        <Grid.ColumnDefinitions>
            <ColumnDefinition Width="97*" />
            <ColumnDefinition Width="303*" />
        </Grid.ColumnDefinitions>
        <Grid.RowDefinitions>
            <RowDefinition Height="43*" />
            <RowDefinition Height="257*" />
        </Grid.RowDefinitions>
        <sdk:Label Height="22" HorizontalAlignment="Left" Margin="11,18,0,0"
                   Name="label1" VerticalAlignment="Top" Width="86"
                   Content="Select Student" DataContext="{Binding Path=Students}" />
        <ComboBox Height="24" HorizontalAlignment="Left" Margin="6,14,0,0"
                  Name="cmbStudents" VerticalAlignment="Top" Width="285"
                  ItemsSource="{Binding Students}" Grid.Column="1" />
        <StackPanel Margin="11,18,0,0" Grid.Row="1" 
                    Grid.Column="0" Grid.ColumnSpan="2" >
            <StackPanel.Resources>
                <DataTemplate DataType="local:StudentViewModel" >
                    <local:StudentEditView />
                </DataTemplate>
            </StackPanel.Resources>
            <ContentControl 
            DataContext="{Binding ElementName=cmbStudents, Path=SelectedItem}" 
            Content="{Binding}" 
            />
        </StackPanel>
    </Grid>
</UserControl>
Here we have thrown the ContentControl inside a StackPanel. In the Resources section of the StackPanel, we have overridden the DataTemplate for StudentViewModel. Since local resource have preference over application level resources so this DataTemplate is applied for the StudentViewModel in ContentControl. When we run the application and select a student, the instance is loaded in the ContentControl with correct DataTemplate applied.


Download:

Sunday, August 7, 2011

Binding Debugging in Silverlight 5

In this post we will be discussing a long desired feature in XAML based applications. This feature is Binding Debugging specified in XAML. This feature is introduced in Silverlight 5.

Let's create a sample Silverlight application AppSilverlightDebuggingDemo.


Definitely an installation of Silverlight 5 is required for this example. Silverlight 5 beta tools can be downloaded from here:

http://www.microsoft.com/download/en/details.aspx?id=23887

If you have it installed already, the second step would allow you to select Silverlight 5 as the Silverlight version.


Here in order to test our example we are selecting the option to create a new website to host the silvelight application specified in previous step. When you hit OK the two projects should be available in Solution Explorer as follows:


Now we add a view model to the Silverlight project MainPageViewModel. It is a simple view model implementing INotifyPropertyChanged interface for supporting change notification for its properties. The view model has two properties StudentId and StudentName, setting both would cause PropertyChanged event to be triggered.
namespace AppSilverlightDebuggingDemo
{
    using System.ComponentModel;

    public class MainPageViewModel : INotifyPropertyChanged
    {
        #region Notifiable Properties

        string _studentId;
        public string StudentId
        {
            get { return _studentId; }
            set
            {
                _studentId = value;
                OnPropertyChanged("StudentId");
            }
        }

        string _studentName;
        public string StudentName
        {
            get { return _studentName; }
            set
            {
                _studentName = value;
                OnPropertyChanged("StudentName");
            }
        }

        #endregion

        #region INotifyPropertyChanged Implementation

        public event PropertyChangedEventHandler PropertyChanged = delegate { };
        private void OnPropertyChanged(string propertyName)
        {
            PropertyChanged(this, new PropertyChangedEventArgs(propertyName));
        }

        #endregion        
    }
}

Let us update the definition of MainPage.xaml as follows:

<UserControl x:Class="AppSilverlightDebuggingDemo.MainPage"
    xmlns="http://schemas.microsoft.com/winfx/2006/xaml/presentation"
    xmlns:x="http://schemas.microsoft.com/winfx/2006/xaml"
    xmlns:d="http://schemas.microsoft.com/expression/blend/2008"
    xmlns:mc="http://schemas.openxmlformats.org/markup-compatibility/2006"
    xmlns:local="clr-namespace:AppSilverlightDebuggingDemo"             
    mc:Ignorable="d"
    d:DesignHeight="300" d:DesignWidth="400" 
    xmlns:sdk="http://schemas.microsoft.com/winfx/2006/xaml/presentation/sdk">
    <UserControl.DataContext>
        <local:MainPageViewModel StudentId="1" StudentName="Muhammad" />
    </UserControl.DataContext>
    <Grid x:Name="LayoutRoot" Background="White">
        <Grid.RowDefinitions>
            <RowDefinition Height="48*" />
            <RowDefinition Height="35*" />
            <RowDefinition Height="36*" />
            <RowDefinition Height="181*" />
        </Grid.RowDefinitions>
        <sdk:Label Height="24" HorizontalAlignment="Center" 
                   VerticalAlignment="Center" Width="189" FontWeight="Bold" FontSize="16"
                   Content="Student Information" Margin="106,24,106,0" />
        <sdk:Label Height="23" HorizontalAlignment="Left"
                   Margin="12,12,0,0" Name="lblStudentId" VerticalAlignment="Top"                    
                   Content="Student Id" Width="83" Grid.Row="1" />
        <TextBox Height="23" HorizontalAlignment="Left" Margin="101,8,0,0" 
                 VerticalAlignment="Top" Width="287" Grid.Row="1"
                 Text="{Binding StudentId}" />
        <sdk:Label Content="Student Name" Height="23" HorizontalAlignment="Left" 
                   Margin="12,8,0,0" VerticalAlignment="Top" Width="83" Grid.Row="2" />
        <TextBox Height="23" HorizontalAlignment="Left" Margin="101,4,0,0" 
                 VerticalAlignment="Top" Width="287" Grid.Row="2" 
                 Text="{Binding StudentName}"/>        
    </Grid>
</UserControl>
In the above view we are using the view model defined previously as DataContext. Here we have assigned some default values the two properties so that the view is loaded with some already existing information. We are binding the properties StudentId and StudentName to the two TextBox(es).Now when we run the application, it should display as follows:


Now open the view's XAML and try hitting F9 while putting the cursor on each of the bindings. This would insert a break point in the Binding expression. The execution would break at these bindings like a regular break point but the difference is that now this break point has been inserted in XAML.


Now let us run the application again. The execution would step at the break point as follows:


It not only steps at the breakpoint, it also lets us to use regular debugging tools provided in Visual Studio. You can see that we have the Locals window opened and it is showing the values of the properties of the DataContext. It also lets us find the issues with binding. Let's update the StudentName binding as follows:


How easy do you think your life would be. Easy debugging...no late sittings at work...more time with family :)

Download Code: