Showing posts with label Visual Studio. Show all posts

Monday, November 4, 2013

Visual Studio 2013 RC Synchronized Settings & Options Enhancements

Visual Studio 2012 introduced various improvements in IDE for improving developer's productivity. One such improvement is Quick Launch Text Box. It allows launching of operations from various places in the IDE including Options dialog, Menu and Nuget. It also allows opening of documents from most recently used and open documents list.


Visual Studio 2013 has added various improvements in IDE. One such improvement is the synchronized settings between various IDEs. It is common for developers to use Visual Studio IDE from various different machines. It also includes the machines @home and @work. Now Visual Studio keeps these settings in the cloud. We can always disable the synchronization altogether or selectively control various options. As you can see below, there are various Environment options. They are from the sub-tabs in Environment page in Options dialog; also includes Text editor options.


Yes we can search in Options list [ CTRL + E ]. This is the similar option as in Quick Launch. This is great productivity enhances as we don't have to dig deeper for the extraordinary feature that we forgot is burried somewhere that we don't remember.

This is bi-directional control i.e. if an option is disabled then neither the settings would be downloaded nor uploaded for the specified option. We just need to login using the same account from all these machines and Visual Studio would make sure that all these settings are synchronized between the IDEs.


Although this feature is available on Express edition of Visual Studio as well but the tool doesn't support the synchronization between Express and non-express IDEs. It supports synchronization between all express machines. On the other hand the settings can be synchronized between professional+ editions including Visual Studio Professional, Premium and Ultimate. It also includes the synchronization of startup options; Here is the comparison of the page between Visual Studio 2012 and 2013; the startup page is not synchronized.


Other Updates in Options Dialog
There are also other updates in the options dialog. One such update is the settings for Preview tab; which was first introduced in Visual Studio 2012. This now includes supports previewing the items in Navigate To dialog [ CTRL + , ]; which was first introduced in Visual Studio 2010.


There is also a new option Performance & Diagnostics under Performance Tools. Let's discuss about it sometime later.

Wednesday, October 30, 2013

Adding PCL Reference to Mono Touch and Mono for Android Applications

October has been a fun month. I got to travel across the country to three different places, met with amazing people and shared the common enthusiasm about technology. It's like our souls know each others. Code camps are opportunities for learning for everyone; including presenters and attendees. For one, presenters in one session like to go to other sessions as attendees, the other is, when they are asked thought provoking questions covered with practical problems of the individual developers. Most of the times, it makes the presenter think about the specialized area; it makes them see it in a different perspective.

I am planning a separate post about the experiences about the October. I think this would be a good idea to discuss some questions on the blog. Let's discuss first question in this post. The question is:

Can we add PCL references in Montouch and Mono for Android applications?

The short answer is Yes; and we can also do that in Visual Studio. I have Xamarin Starter edition installed on my machine. It also includes a trial version of Visual Studio extension for Xamarin tools.

Xamarin Studio
Here I have a sample solution called NameReflectorApp. It has a portable class library project Xamarin.Core. It also has an android application project NameReflectorApp.Android.


The portable class library project is targeting a number of frameworks as shown below:


This is targeting Profile 158 of .net portable subset. There are still some issues with Xamarin Studio like you see a warning message at the bottom of the target frameworks. But don't worry, this should still work. We cannot see here Mono for Android as one of the target frameworks but we can still add such references. In Xamarin's term, this is called Edit References, funny...


Visual Studio Support
Xamarin has support for Visual Studio. But this is not available for all the editions. Generally speaking, it is available for more expensive ones. But we can still play with the extension during the trial period available when we install the starter edition. The best thing is we can decide when we want to start the trial period. We can use this option to first familiarize ourselves with the technology and when we need to see how well it integrates with our current Microsoft technologies, we can start the trial period.


Visual Studio is not as forgiving in adding references in such case. There are issues with the Xamarin's Visual Studio extension. As we add our portable class library's reference to Android application, it shows up the following error dialog.


Xamarin developer community terms this situation as a lie. In order to fix this, we need to use some xml hack. I would totally recommend the following post where we discussed how we can add additional frameworks options for Portable Class Library projects.


As we discussed in the above post, we can add options for additional target frameworks by adding files the Supported Frameworks folder for a target profile. Let's add two new Xml files to our selected profile as follows:


The contents of these files are as follows:

After adding the above files, we need to restart Visual Studio. After that, as we go to the PCL's property page, we see that there are already Xamarin.iOS and Xamarin.Android in the target framework list. If we hit Change button, we see additional options for Xamrin.iOS and Xamarin.Android. These options are checked.


Adding the reference to the Android application project goes through just fine. Here is the portable library's reference added to the project's references list.


If you have Xamarin Studio running then restart this and open the same solution again. You can see that these new frameworks are also available in Xamarin, which is amazing.


Download


Thursday, October 10, 2013

VS2013 RC: Portable Class Libraries Target Frameworks

In this post we are going to discuss the changes in target framework selections in Visual Studio 2013 RC. Up until, Visual Studio 2012, Visual Studio has supported the following framework selections:
  1. .Net framework 4.0, 4.0.3 & 4.5
  2. Silverlight 4 & 5
  3. Windows Phone 7.x & 8.0
  4. Windows Store Apps
  5. Xbox 360
With Visual Studio 2013 RC, now Portable Class Libraries can also support targeting .net framework 4.5.1 and Windows Store Apps (Windows 8.1). But Visual Studio 2013 has mainly reduced other target frameworks for PCL. The following is the list of frameworks which are not supported in Visual Studio 2013 for PCL development.
  1. Silverlight 4
  2. Windows Phone 7.x
  3. Xbox 360


Supported Framework Xml Changes
In order to support a combination of target frameworks for PCLs, Visual Studio keeps a list of xml documents in Supported framework folders for each profile. Actually, a profile is selected based on target framework selection matching the profile.


Now we can develop PCLs in three different versions of Visual Studio. They are Visual Studio 2010 SP1, 2012 and 2013 RC. It appears that in order to limit target frameworks for PCL development in Visual Studio 2013 RC there are some changes in the Xml schema for these documents. Let's see the document for Silverlight 4 in Profile44 in Visual Studio 2012.


Visual Studio 2013 has added a few new attributes. They are FamilyName, MinimumVisualStudioVersion and MaximumVisualStudioVersion. We must remember that the version of Visual Studio 2012 and 2013 RC are 11.x and 12.x respectivly.


The above is the Xml document for Silverlight 4 in the Supported Framework folder in the same profile after the installation of Visual Studio 2013 RC. We can notice that the maximum version for the framework is "11.0", so the framework is not supported in Visual Studio 2013 RC. Below is the framework xml for Windows Store apps (Windows 8.1) in \v4.6\Profile\Profile44\SupportedFrameworks folder. From the xml document, we can clearly figure out that this profile can only be used for a Visual Studio version 2013 RC at minimum.


Converting Project for Unsupported Frameworks
Opening a PCL project in Visual Studio can convert the target frameworks to one of the supported frameworks. A Silverlight4 project is converted to Silverlight5 project.


We can opt to not migrate the project to a new framework version but we wouldn't be able to work on it in Visual Studio 2013 RC then. The project is shown in Solution Explorer as follows:


There seems to be a bug in the current version, which shows the following error message if we don't opt to convert, by not checking the check box. It is shown as follows:

Sunday, September 8, 2013

Local Repository for Resharper Extensions in an Enterprise

Resharper extensions are simply nuget packages. As we discussed before, we can host a local nuget repository [Hosting Nuget Feeds] within the organization boundaries. You might be wondering if that is also possible for Resharper Extensions.


Like Nuget, Resharper also maintains a local cache for the extensions. The local cache is maintained in %APPDATA% folder. We can use package extensions from this folder to build up our repository bearing the legal licensing issues.


Just to test how it works, let's copy the contents of this folder to a shared folder with a UNC path. It also totally works with local file system path. But don't directly share it from this folder. It wouldn't make sense to directly add this path as a repository. This is because the presence of this package means that the package is already installed. This is different than the argument when we shared local cache as a nuget repository as those packages are installed to projects and solutions. On the other hand, resharper extension is not specific to a project or solution. Once installed it is available to all visual studio sessions as long as you have them and resharper enabled.


After adding the repository, the repository becomes available as a source of resharper's extensions. Please notice an extra option under repository in the following image. As added above, the repository is titled Local Repository.


Sharing Resharper Extension Manager Settings
As an enterprise developer, we need to think about the whole team. We can't expect each developer to be adding this setting on his own as it is opening the system to human error. Additionally, what if we want to change the source of the repository to another location. Do you want another communication with the whole team. Best of luck if you do :). This should be seamless. Here layered settings for resharper can come for rescue. This is a universal storage mechanism for resharper's settings.


You can view and edit the layers from Resharper -> Manage Options menu in Visual Studio. Here is the interface to manage layers for settings.


For the resharper extensions we can use system wide settings layer. I don't see any issue with creating a group policy to copy the global system wide setting to copy the local repository location. The user specific settings are maintained in roaming profiles of the user under %APPDATA% folder. I don't know why they call it This Computer" when they are defined in user's APPDATA folder.


I think Nuget got it better as Nuget 2.7 also introduced a similar feature but those global settings are defined in %ProgramData%\NuGet\NuGetDefaults.config which is system wide.

Resharper Extension - Auto Nuget Installation

In this post we are going to discuss a new Resharper extension. We are going to discuss why we need it and how it makes our lives easier as developers. The extension is called 
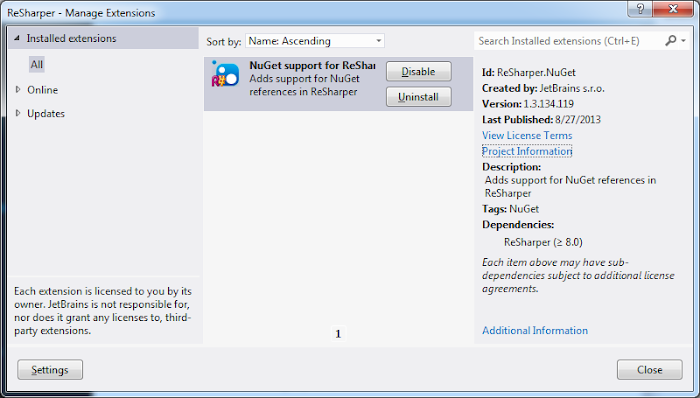
Nuget Support for Resharper. The package works like another feature of resharper where it suggests assembly references for types used in a project based on the other projects in a solution. The extension extends support for suggesting nuget package reference instead of an assembly reference if the assembly comes from a package. You can install the package using Resharper 8 EAP Extension Manager.


We discussed about Extension Manager feature in Resharper 8 EAP before. You can refresh your knowledge here.

Creating Package
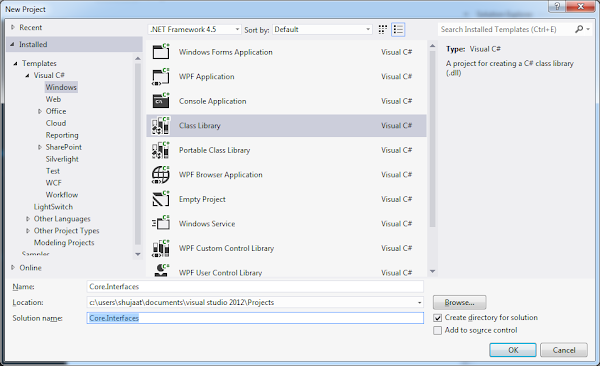
Let's create a sample class library project Core.Interfaces. The project is targeting to framework version 4.5. You can skip this part if you already have a package to reference.


Let's add some interfaces to the project. This is a library for providing necessary API for order processing. Here we are providing an interface IOrder as a contract for an order. We are also adding an interface for Order Factory.


Let's first create the nuspec file for the project. We use Nuget command line tool to create the specification file. We need to provide the path of command line tool so that it could create nuspec for the *.csproj file in the current folder. To save the trouble each time, you can provide the tool's path in the %PATH% environment variable.


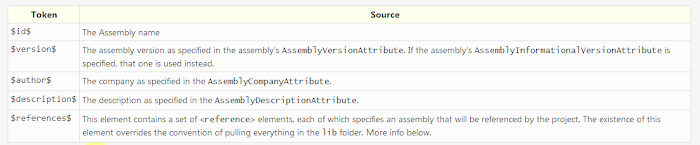
The specification is created with a few tokens. Let's cleanup the file keeping the required tokens as follows:


The tokens are populated with the assembly attributes as specified in AssemblyInfo.cs in the project if this nuspec is used to create the project. You can use the following mapping from nuget.org specification.


For our project, I have updated the contents of AssemblyInfo.cs as follows:


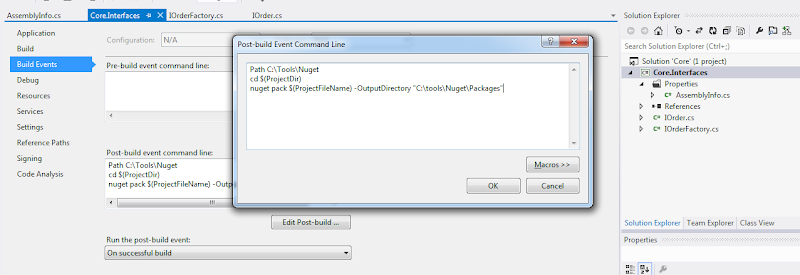
Now let's update the post-build event for the project to create a nuget package. Since we have nuspec file in the same directory as the csproj file, nuget tool should use nuspec file definition to create the package. It should then use the assembly for token replacement generating the resulting package. Here we are creating the package in a specific output directory. For the local development, we can use the path as a local repository for the package. Now updating the package in any project would use the latest source package.


Now whenever we build the project, the nuget package is created in the output directory. The package for Core.Interfaces is created as follows:


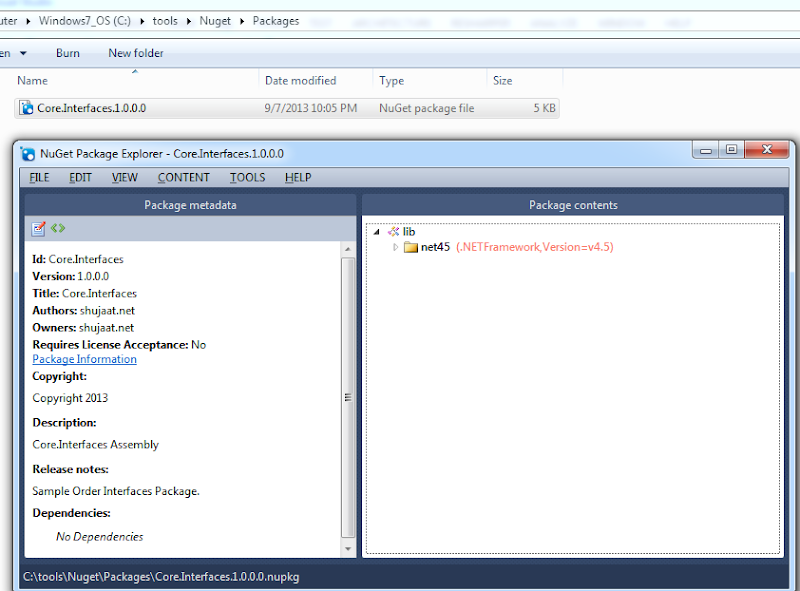
Adding Local Package Repository
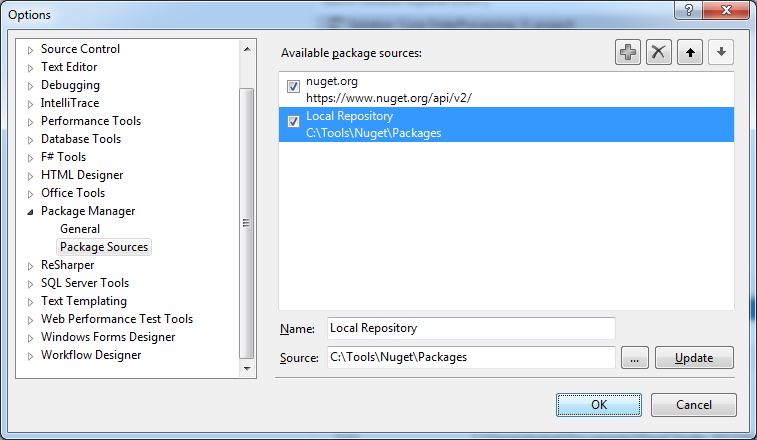
Now let's make sure that the package is used from the local storage. We can also uncheck nuget.org path to make sure that packages from only this repository are being used. You might need to clear up local package cache for extra safety. Let's add the local package path to the nuget package manager setting as follows:


Using Package from Local Repository
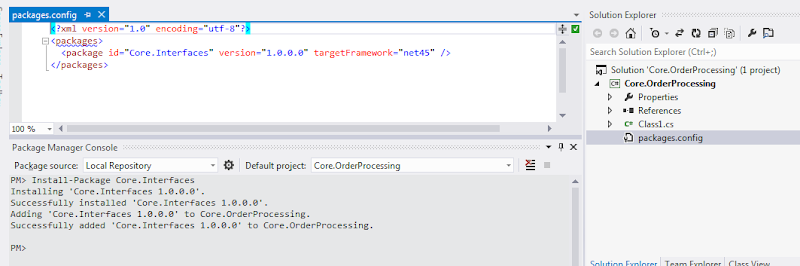
Now let us add another class library project Core.OrderProcessing. We install the nuget package previously created to this project. Just make sure that Local Repository is selected before you install the package.


Let's provide the definition of the interfaces introduced in Core.Interfaces project as follows:


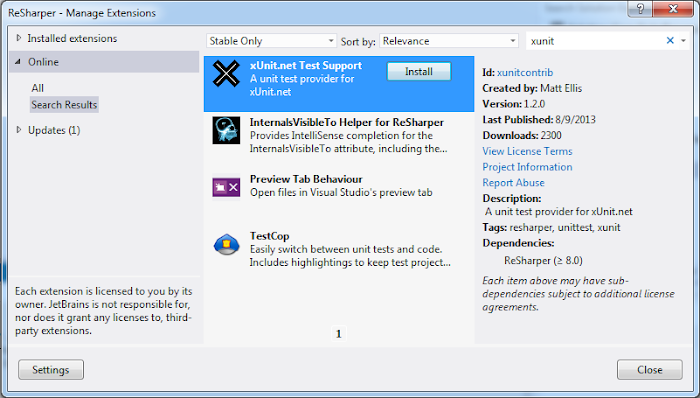
Now let's add another project to write unit tests for our library. Let's use xUnit for these tests.We discussed about this extension in our Resharper 8 features' discussion here.


Let's add the following tests for testing OrderFactory:


Since the types are returning interface types, we need to reference Core.Interfaces library. Here Resharper is really helpful for helping us what library references we are missing. It goes one step further by making it easier. It provides the support in action bar to add the required assembly, which is quite amazing.


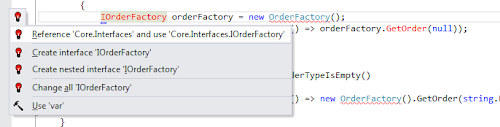
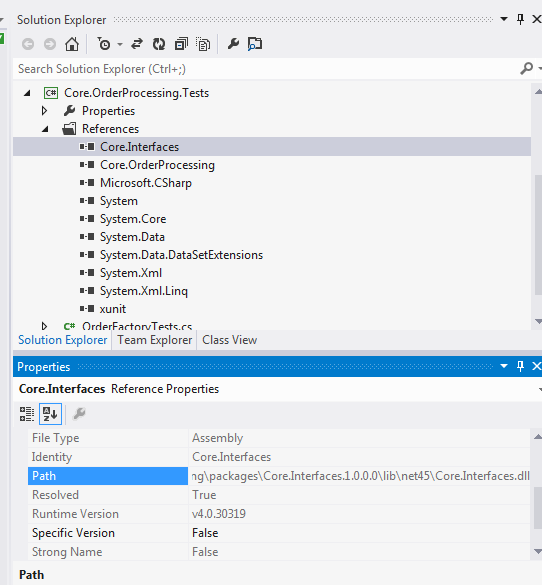
Selecting the above option add the required assembly reference in the project. This is a well known resharper's feature. Although this is great for other assemblies but this is not perfect for the assemblies coming from a nuget package, which is exactly the case here. The assembly is referenced from packages folder.


Extension to Install the Source Package
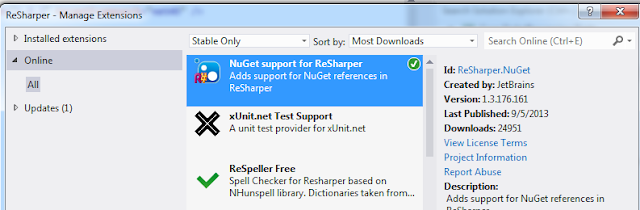
In order to help us with the above scenario, we can use Nuget Support for Resharper. This is a resharper extension which can be installed using Resharper's Extension Manager. If we install this, then selecting the same extension would not directly reference the assembly from packages folder. It would install the source package instead. Installing the source package would automatically install the other dependencies for this package, which is even better.


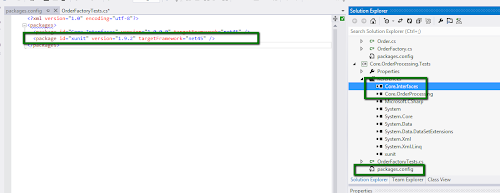
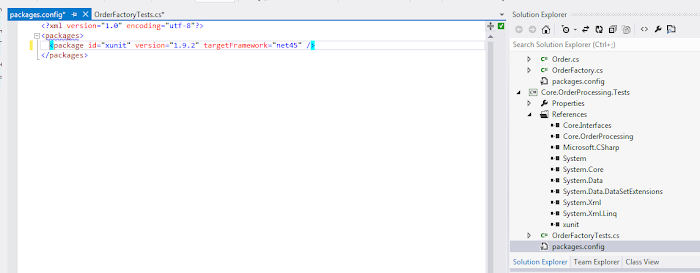
It must be remembered that the extension doesn't add an extra item to the action bar. It just uses the option to add the assembly reference but it installs the source package, and hence, all of it dependencies. Since the type was sourced from Core.Interfaces, the same package is installed. An entry is added to project's packages.config file. The package installs a reference to the required assembly. Additionally all the required namespaces are added to the code.


Zindabad!!!

Possible Improvements
There is still room for improvement for the extension. Although it does a very good job for installing the source package in the scenario where the types are sourced from a package but it seems to only work in the scenario where there is an explicit usage of types. In the case of implicit scenario where the assembly should be referenced because of cases like return type of a method used. In those cases, still the resharper suggests to add the required assembly and the assembly is directly referenced from the packages folder. Let's update the code for our test as follow.


Here we are not explicitly specifying the type but since GetOrder returns an IOrder, it requires an assembly reference of Core.Interfaces.


Let's see the reduced options in the action bar. There is an option to add the required assembly reference. Let's use that.


Selecting the above does add the required assembly reference (resharper's feature) from packages folder. It doesn't install the required package. I think the extension can also listen for this scenario and install the source package instead.


Download

Tuesday, September 3, 2013

Automatic Package Restore in Nuget 2.7

Microsoft released the latest Nuget Package Manager late last month with a few bells and whistles. This is version 2.7 of the tool.


Now we have discussed about Nuget in the past a few times. You can find the discussion about why we don't want to check-in packages folder in the source repository in the first post. This calls for automatic package restoration as the developers build their project after getting it from source repository. This post is all about the enhancements in automatic package restoration in Nuget 2.7. Let us first try to update the Visual Studio Nuget Package Manager extension. Here we are updating it in Visual Studio 2012 Ultimate.


After updating the extension, we can notice that the package manager settings for package restoration is updated. We now have the following view [Tools -> Library Package Manager -> Package Manager Settings]. The available options are selected by default.


It seems a little confusing that an extra sub-option is provided for package restoration during build of the project. We should also see what it results if we have the first option selected while not opting for the second one. The package restore settings used to be as follows in the earlier versions of Nuget Package Manager. It just has one option to allow restoring the package.


Let us create a sample Console application NugetPackageRestoreEx. We install a reference nuget package Microsoft.Diagnostics.Tracing.EventSource. It's a pre-released version, hence -pre switch. You might also be noticing the package source being nuget.org, this is another enhancement in the new version of the extension. I think it is better than what it was called before i.e. official package source.


This should create a packages folder in the project directory. Let us remove the folder. This would be a real test if we are able to restore the package automatically during build.


In the earlier versions, we needed to enable package restore for the solution which was fulfilled by incorporating nuget.exe in the solution with adding build target to install packages by nuget.exe using packages.config for each project. In the current release, this should automatically work without setting anything for the solution or project. As the package is being restored, we see the following information message being displayed clearly specifying the packages being downloaded. We notice that as we build the project again, the packages folder was restored successfully.


Since this is now automatic, it doesn't really make sense to still have Enable Package Restore option for the solution. It seems that the option is going to go away in near future. Selecting the option would add a .nuget solution folder.


Package Restore on a Build Server
Now that we have seen the restoration of packages in Visual Studio through Nuget Package Manager extension updates. What about the build server as you wouldn't expect build server to be running Visual Studio. For this, there are updates in nuget.exe to restore packages in a solution and its projects. If there is only one solution in a folder, then we don't need to explicitly specify the name of the solution. But first we need to download the nuget.exe command line utility.


We simply need to run the following command before we run MSBuild targets. This would ensure that all the packages as specified in the solution's or containing projects' packages.config have been downloaded. As a group policy, we can copy the nuget.exe to a universal path on build machines.

nuget.exe restore

The above command should download all the nuget packages as described. It's a different package that I used later on. But you should be getting the idea.


In order to make it more easier for developers, from the release notes it seems that the nuget team has been working with Continuous Integration servers to automatically use nuget restore command before build task. This would make sure that we don't require any changes whatsoever in our solutions or projects. The CI servers mentioned in the release notes are TeamCity, TFS and Appharbor. It also includes Windows Azure websites so that the packages are pushed and restored before the website is built.

Download